Resources
Documentation, tips and tricks for Archeo users
These resource pages are meant to give you introduction and help you all the way to get started using Archeo.
If you need any assistance please contact us:
Send us an E-mail: support@communicate.no
Call us: +47 90211900
Archeo is a cloud-based business and message tracking service. The service is developed by Communicate Norge AS, based in Halden, Norway.
Communicate has long experience developing software to support integrations between systems, and integration has been their core business for the last 20 years. In 2006 Communicate developed Message Tracking Monitor (MTM). This is a on premise solution to give customers control over their messages and integrations.
Archeo is based on Message Tracking Monitor and the knowledge of the challenges businesses have to get a good overview and insight of their business processes.
We know that in a fast growing and rapid changing environment, where there are many applications, it is difficult to get the overview and follow up messages and information flow in the systems.
Archeo offers a way to log data and messages giving the user insight and overview over all the business processes and offers easy and effective search capabilities. This includes free text search in all content, and a broad selection of filters.
Archeo is a cloud-based solution. It does not require onsite environment or prerequisites. All information provided to Archeo is done by a REST API. A cloud based portal is available for following up and searching for your business processes, getting your statistics and setting up your logging.
The user interface is designed to make anyone in your organization able to use this service, and one of the main goals is that the end users, can follow up their own business processes and messages.
Let your users only access what they need to see by setting role based and user group rights. This includes the possibility to restrict the user to open the file content of a message in your business process.
Track your first message in minutes, with the easy accessible REST API. You will be up and running in minutes.
This section shows the first steps to start using Archeo and how to upgrade your trial subscription to a new paid subscription.
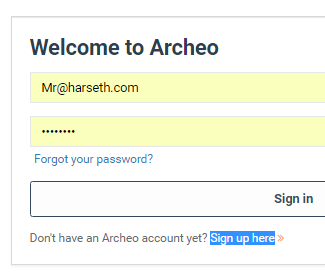
If you do not have a Archeo user, you need to create this as a first step. A trial subscription will be created alongside with this registration.
Click “Sign up here”
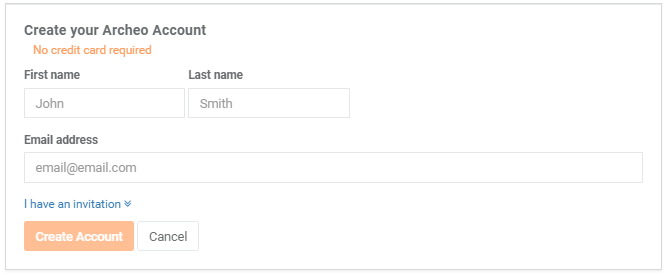
Fill out requested information and click “Create Account”.
Add a couple of more information. Give your subscription a well thought out name. For time being this is not changeable.

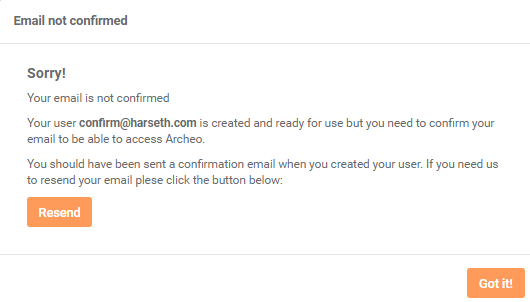
When you click “Create” you will be automatically logged inn to your new subscription in Archeo. NOTE, after the first time you log out, you need to confirm your E-mail to continue to use the application. When you try to log inn, this message will be displayed.
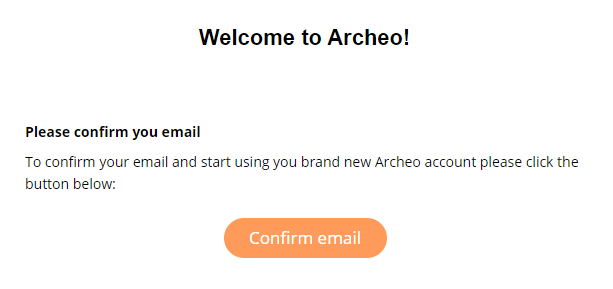
Go to your mailbox and look a mail from noreply@archeo.no, and click on the “Confirm email” button
You will the get a confirmation on this action, and you have now full access to your subscription in Archeo.
In your trial subscription there is a clear notification on remaining days. To upgrade to a payed subscription, click “Subscribe now” button.

The upgrade subscription form lets you select a tier based on expected usage. Select tier and fill out all requested data. We support Visa, Mastercard and American Express. Please note that we need your Company Name and VAT number due to Norwegian legislation. VAT will only be added to the invoice for Norwegian customers.
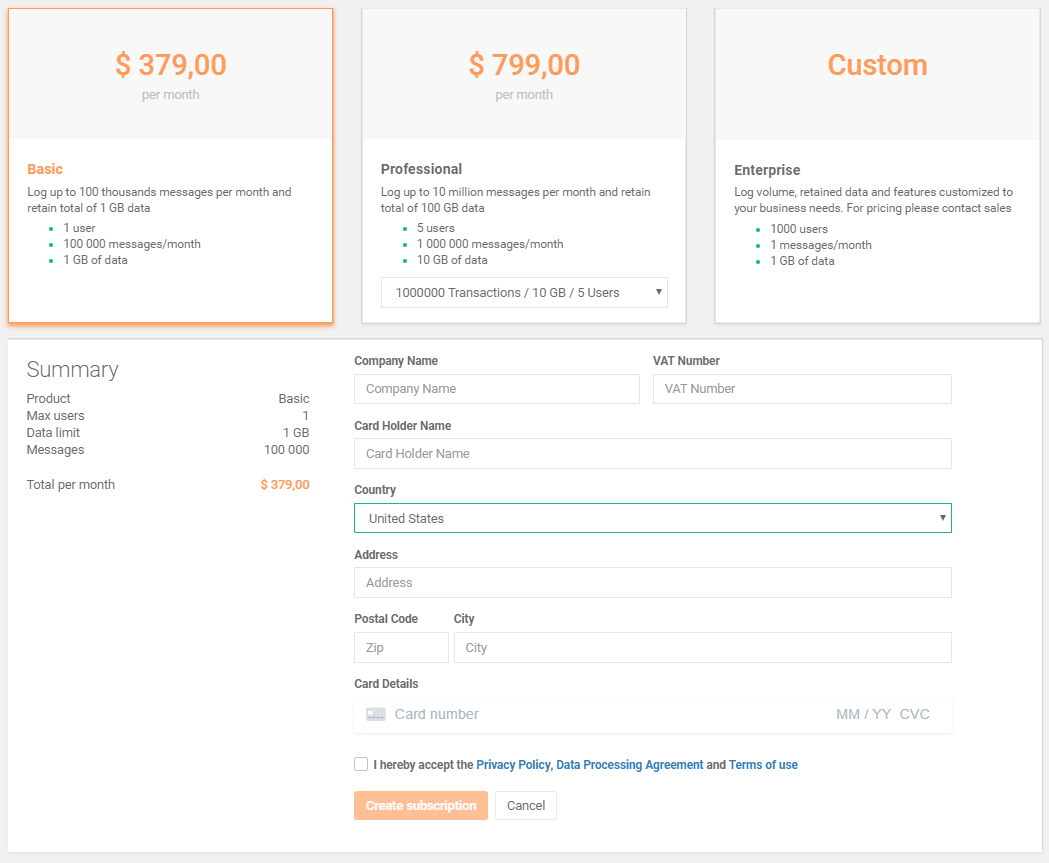
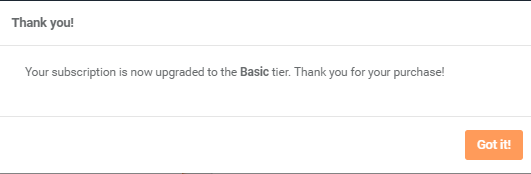
When the payment is excepted, your subscription is updated
To View and administer your subscription, please see next section “03 Using Archeo”Tab Content goes here
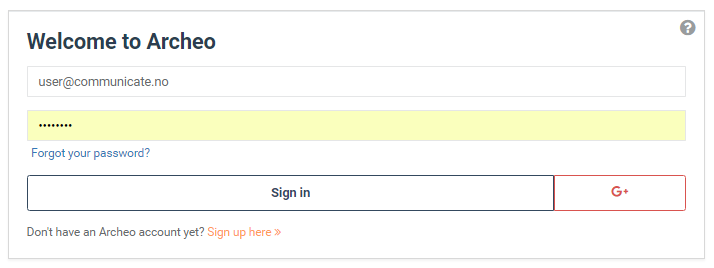
Visit https://portal.archeo.no
Enter your credentials and click on “Login”
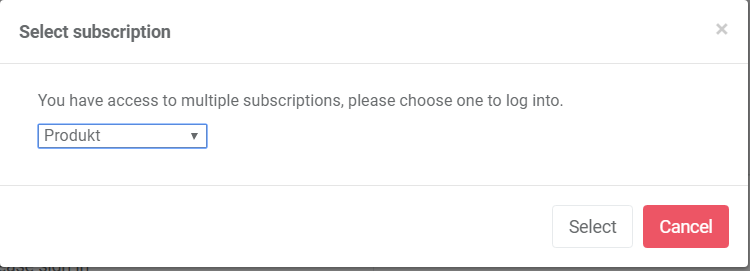
If you are member of more than one subscription, select the subscription you want to login to
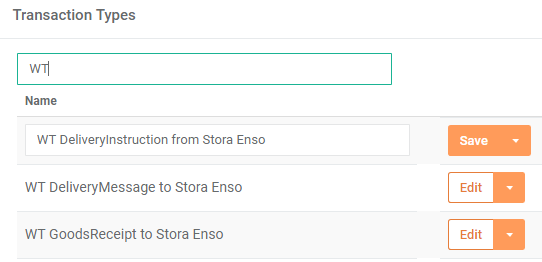
Transaction types are the top level definition of a business process. The Transaction types are created in the administration web interface and used when logging to the logging API. The name you choose for your transaction type is the value you use when logging to Archeo using our API. The field in the API used for this is the TransactionType field.
Click Administration menu → Transaction Types
To add new enter a name and click “add”
All existing transaction types are listed and you have the opportunity to edit the name if you wish. Use the “Filter on name” textbox to filter the list.
Example for the transaction type used in the json data format supplied to the API.
[
  {
    "transactionId": "Unique chosen id for this transaction.",
    "transactionType": "My Transaction Type",
    "messageType": "My Message Type",
    "transactionTag": "(Optional) Unique self chosen id for this message log",
    "processed": "2019-01-15T10:23:32.2407737+00:00",
    "sender": "(Optional) Sender of the message",
    "receiver": "(Optional) Receiver of the message",
    "description": "(Optional) Descriptive info message",
    "fileName": "(Optional) Filename of transaction",
    "status": "Success"
  }
]Logging with Status is mandatory and every logged step need to have a status. The main status for a transaction is set based on latest status logged.
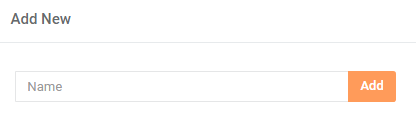
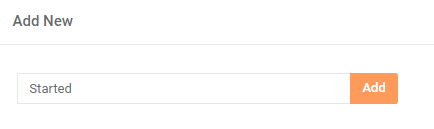
To add new status enter a name and click “add”
All existing statuses are listed with editing capabilities for the name and the color shown in a search result.
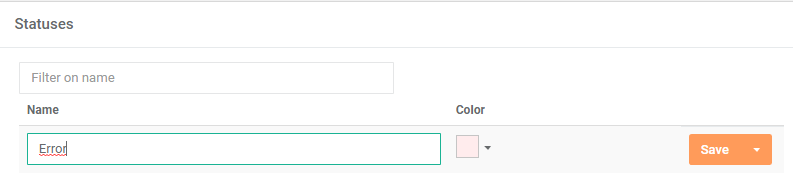
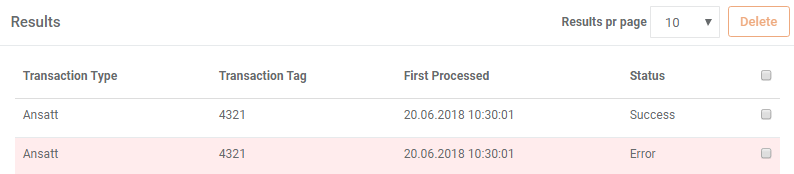
When a user performs a search, rows will be highlighted with the rows status chosen color.
Example value for the transaction type used in the json data format supplied to the API.
[
  {
    "transactionId": "Unique chosen id for this transaction.",
    "transactionType": "My Transaction Type",
    "messageType": "My Message Type",
    "transactionTag": "(Optional) Unique self chosen id for this message log",
    "processed": "2019-01-15T10:23:32.2407737+00:00",
    "sender": "(Optional) Sender of the message",
    "receiver": "(Optional) Receiver of the message",
    "description": "(Optional) Descriptive info message",
    "fileName": "(Optional) Filename of transaction",
    "status": "Success"
  }
]A message type is the type of the message logged in a transaction. One transaction may consist of many message types.
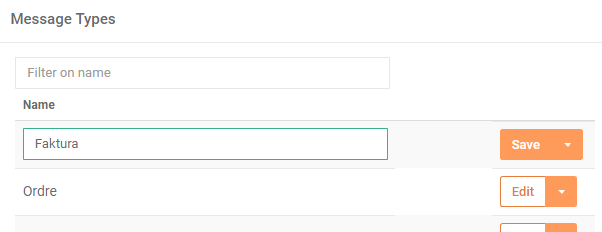
The message types are created in the administration web interface and used when logging to the logging API.
Click Administration menu → Message Types
To add a new message type enter a name and click “add”
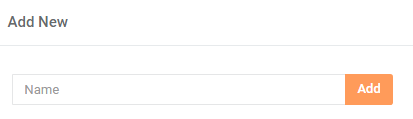
All existing message types is listed with the possibillity to edit the name.
Example value for the transaction type used in the json data format supplied to the API.
[
  {
    "transactionId": "Unique chosen id for this transaction.",
    "transactionType": "My Transaction Type",
    "messageType": "My Message Type",
    "transactionTag": "(Optional) Unique self chosen id for this message log",
    "processed": "2019-01-15T10:23:32.2407737+00:00",
    "sender": "(Optional) Sender of the message",
    "receiver": "(Optional) Receiver of the message",
    "description": "(Optional) Descriptive info message",
    "fileName": "(Optional) Filename of transaction",
    "status": "Success"
  }
]
This field is optional. If the message type field is used, the message type needs to be defined in advance in the web user interface.
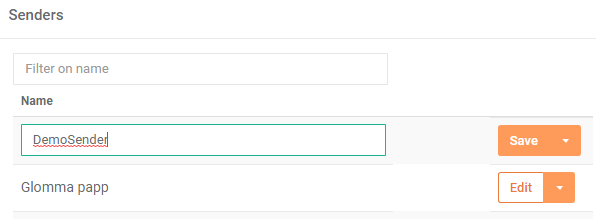
Senders and receivers are automatically created if they do not exist in Archeo. You may add or edit senders and receiver manually.
Click Administration menu → Senders/Receivers
To add a new Sender/Receiver type enter an name and click “add” Click the “New Sender/Receiver” and enter an name and click “add”
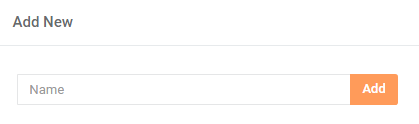
All existing Senders/Receivers are listed with the possibillity to edit the name.
Create groups for subscription. Users may be added to groups, and Access Rights is set based on groups.
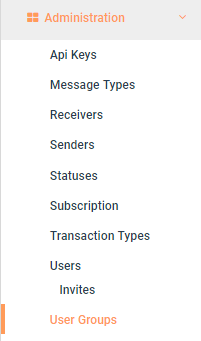
Click Administration menu → User Groups
To add new user group enter a name and click “add”

All existing groups are listed with the possibility to edit the name.
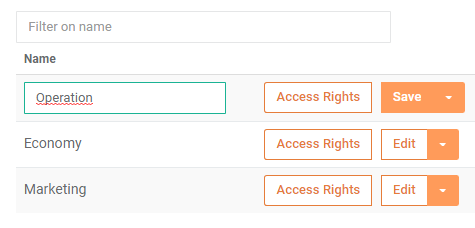
To set accessrights for a usergroup, clik the “Access Rights” button for the given user group. All the Tranasction types are listed, with options to set level of acces.
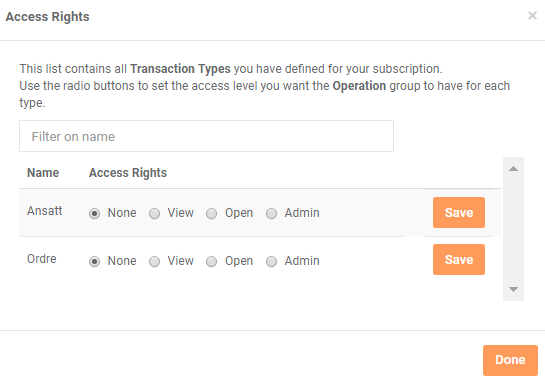
Access right levels:
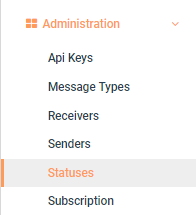
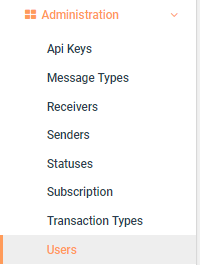
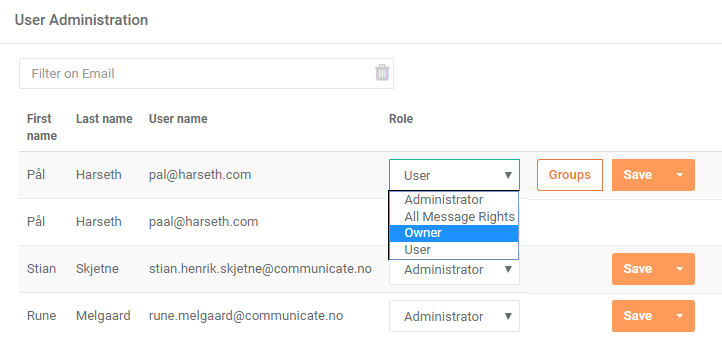
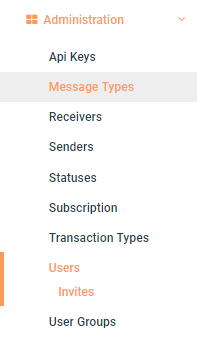
Click Administration menu → Users
All users are listed:
In the user administration section click the “Groups” button for a user
![]()
To add or remove a group from a user, use the > >> << < buttons. The list on the left lists all groups the user is not member of, and on the right side all the groups the user is a member of. 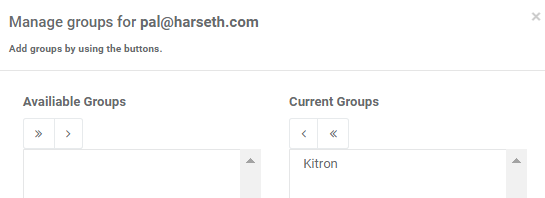
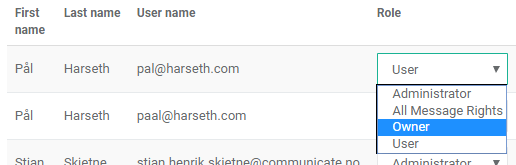
Archeo supports four predefined roles:
Add user to role, use the dropdown:
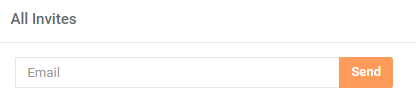
To invite a user add the e-mail address in the textbox and press “Send”
All previous invites are listed below:
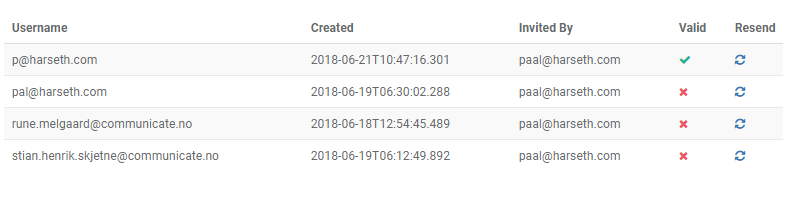
The invite is valid until the user accepts the invitation or the administrator invalidates the invite by clicking on the green check icon.
To revalidate a invite, click the delete icon. To resend a invite, clik the resend icon and an E-mail will be sent.
When a invite is sendt, the e-mail recipient receives an e-mail:
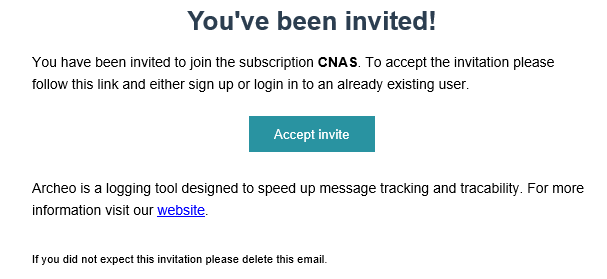
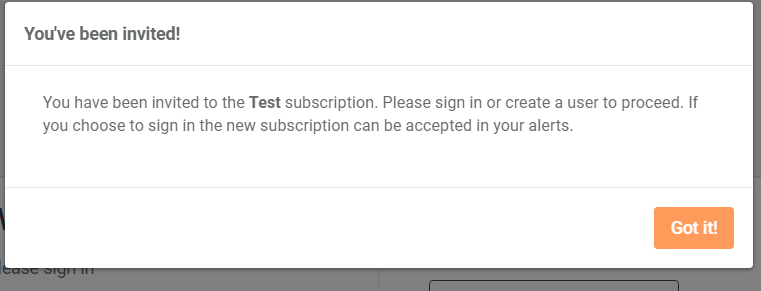
By accepting the invite the user will be guided to:
The subscription page gives you information about your subscription and usage.

This section gives you all information concerning payment and billing.
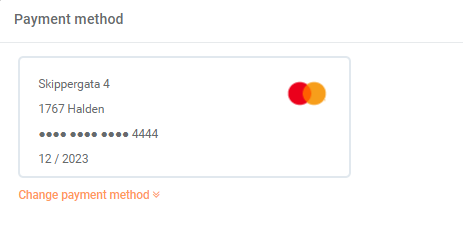
Payment method
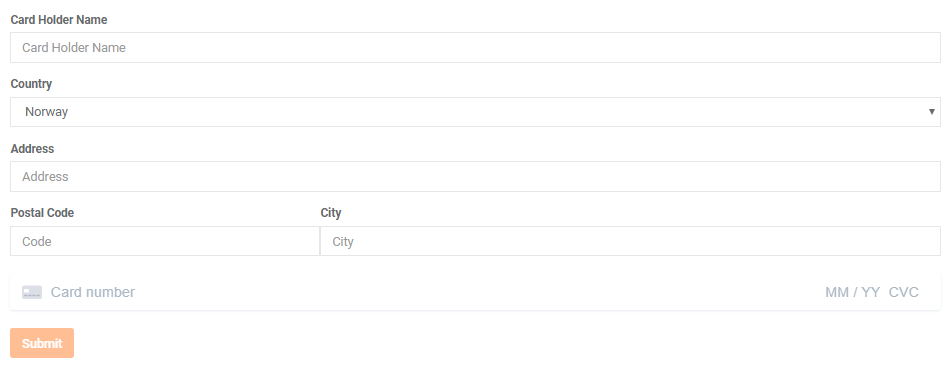
Show your current payment method (credit card), with the possiblility to change this information by clicking “Change payment method”
When changing payment method you need to fill out required information and click “Submit”. You will get a confirmation message when card is changed.
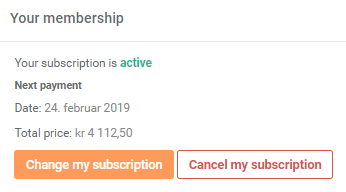
Membership
Show subscription status and details around next payment. If you want to cancle a subscription, do this by clicking the “Cancle my subscription”. After a confirmation of this action your subscription will run to next payment is due. Remember there is alwas possible to reactivate this subscription by visiting this page again. We are working on automating upgrading and downgrading of subscriptions. In the meantime, please contact us at support@archeo.no
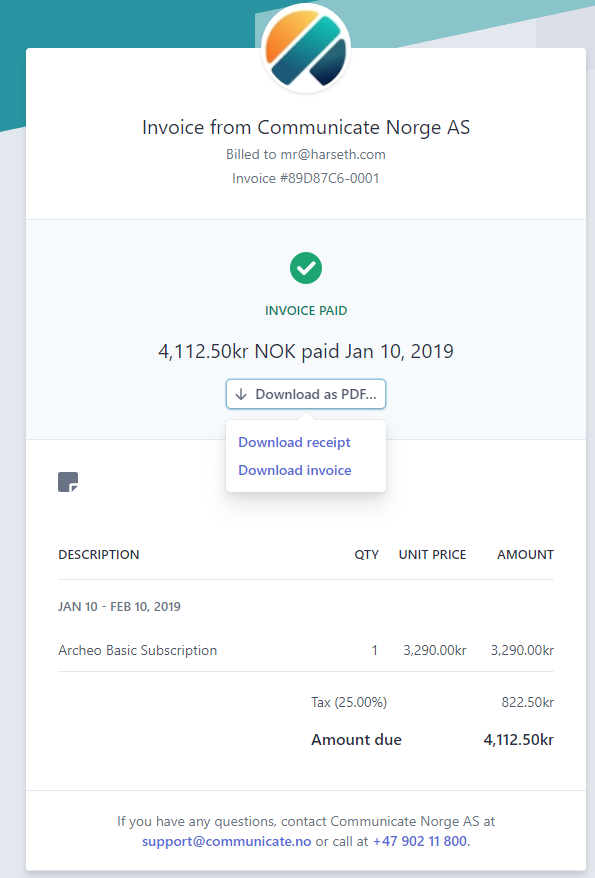
Invoices
List all your invoices stating all relevant information.

Click date to downlad the invoice or recipt as PDF file.

Advanced:

Use filters to narrow down your search. Use “Content Search” to search for content in your files. The “Search” button performs the search, and lists all results in a grid. The “Clear all” button clears the current filters to the default settings.
Filters:
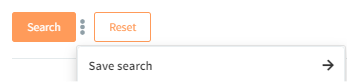
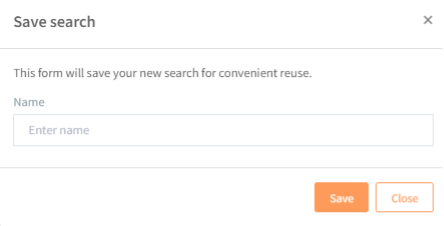
To save a search, create a search using the available filters and save the created search through the three dots next to the search button:
Enter a name and save:
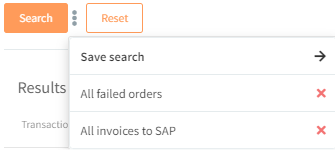
To select a saved search, by selecting from the three dots menu next to the search button:
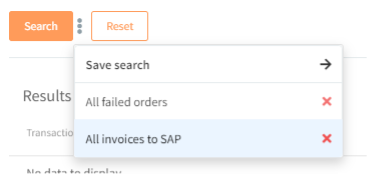
To edit a saved search, select the saved search:
Adjust the search filters and select “Save search”, the “edit search” form will have prefilled the name of the current saved search:
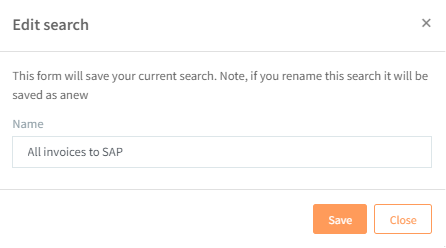
Click “Save” and the current saved search will be updated. Note that if you rename the saved search it will be saved as anew.
All transactions matching the search will be listed here:
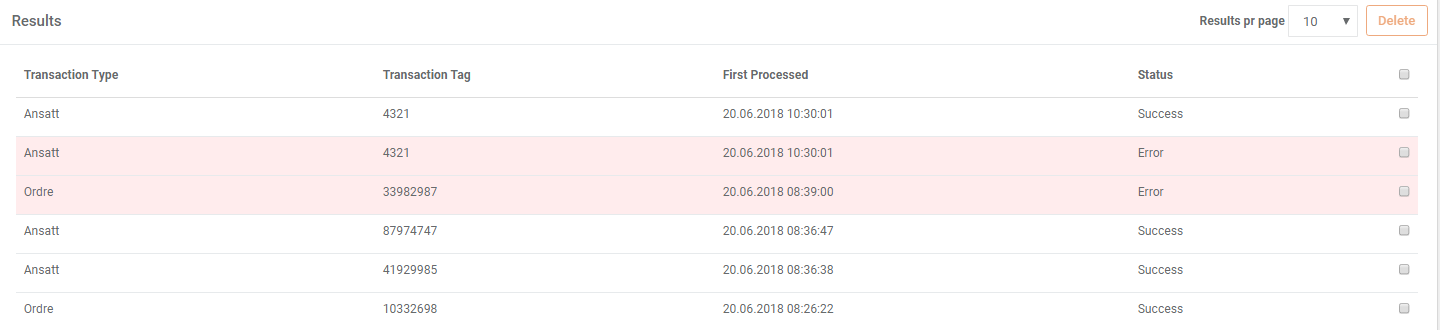
Click on a row to expand the current transaction flow.
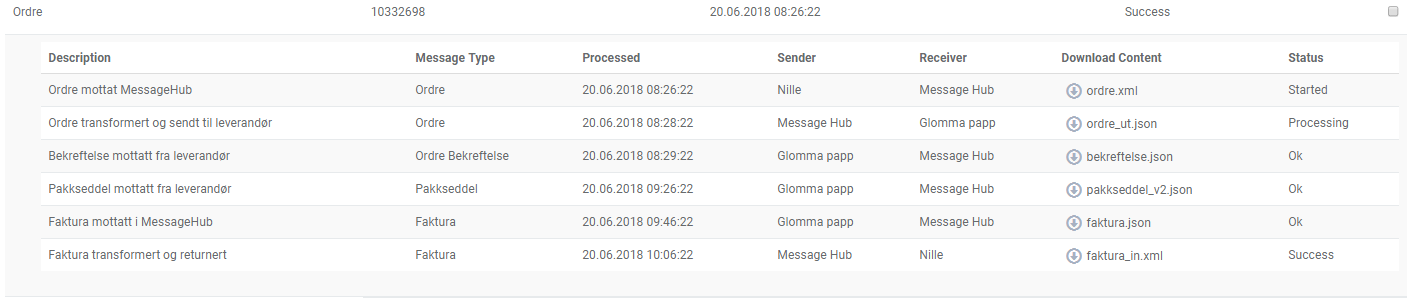
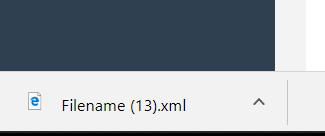
To open the file content click on the “filename” in the “Download Content” column. Depending on the browser the file content is downloded.
An example with Google Crome :
Select one or more lines from search result and select the “Add logstep for selected”

In the new form add “Description” and Select a Status. This will insert an new logstep, and change the main Status accordingly.

Based on a search you can copy this to clipboard from the search menu. This comes in handy when you want to share and show someone else the result of a search.

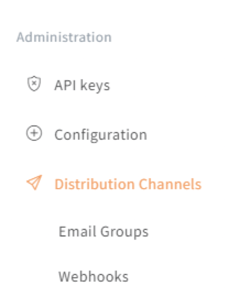
At the current time Archeo supports two channels: E-mail and webhooks.
E-mail groups:
Select the "Add new email group" to create a new email group:
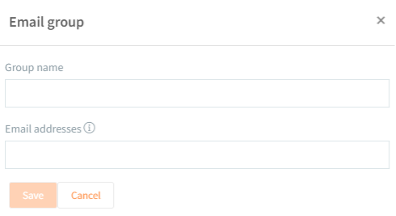
Give the group an appropriate name and add the e-mail addresses separated with ; (semicolon) and save. All e-mail groups are listed and possible to edit or delete.
Webhooks:
Select the "Add new webhook" to create a new:
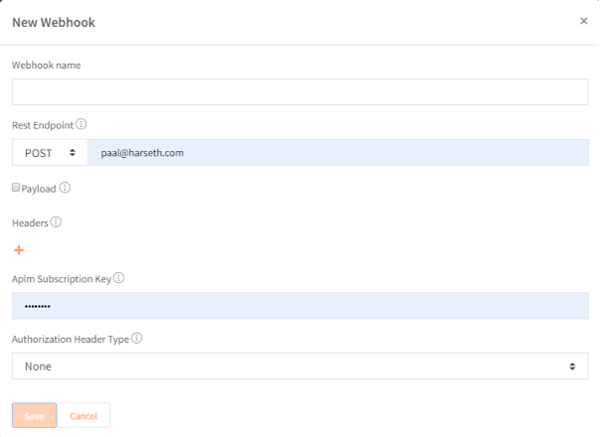
Payload:
Default Alert Payload:
Default Resend Payload:
Define payload
You may define the payload by using Liquid (lage som link: https://shopify.github.io/liquid/)
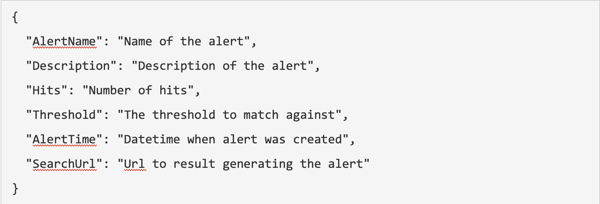
The webhooks are in use by Alert and Resending of messages, both payload may be defined. There are some templates available to use “as is” or base the payload on.
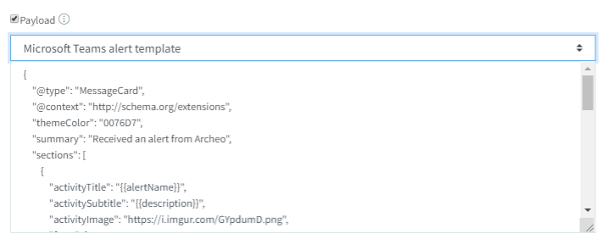
The payload needs to validate as Json when transformed and we support use of following properties (case insensitive):
Alert payload:
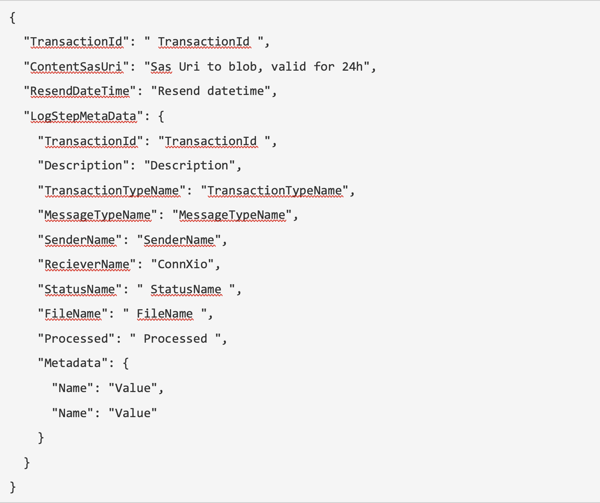
Resend payload:
Authorization Header type:
1. None
2. Basic:
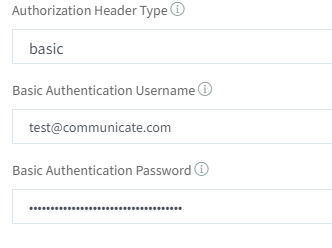
3. Oauth2
To create a new alert, you can create an alert based on a search, for the search form:

Or create a new from the administration:

1. Name and description
Name is required. We recommend giving the alert a descriptive name, like “Error on orders from Salesforce”

2. Filters
The filters work exactly like when searching.

3. Conditions
Create the condition to meet the alert based on the filters.

Logical operator: The operator used to compare the result value against the threshold.
Threshold: A value to trigger the alert.
Timeout: This value determines how long the alert should wait after an alert is triggered before a new alert should be triggered.
Period: Defines the interval in minutes over which result is aggregated.
Frequency: Select the frequency for how often the alert rule should be run.
Timeout: This value determines how long the alert should wait after an alert is triggered before a new alert should be triggered. If frequency is set to 15 min and timeout is set to 1 hour, alerts will be triggered at most every hour.
Enable timeout override: Override the timeout if an override threshold is reached.
Timeout override threshold: The threshold for when to override the timeout. If this threshold is reached during a timeout, a new alert will be triggered. If frequency is set to 15 min and timeout is set to 1 hour, and “timeout override threshold” is set to 50. If the threshold of 50 is met it will override the timeout and send an alert. This is handy way to discover when things have gone really bad regardless the timeout.
4. Alerts Distribution Channel
How the alerts are distributed. For now, we suppoert e-mail and webhooks.
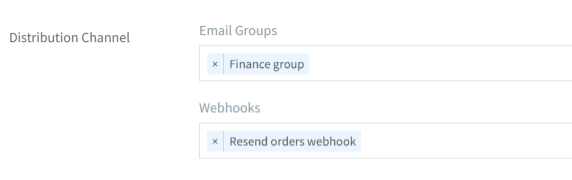
To add Email-groups or webhooks, see the section about distribution channel. When an alert is triggered everyone on the e-mail group will receive an e-mail, with link to open search view with result that triggered the alert

And the following information is sent to a defined webhook:
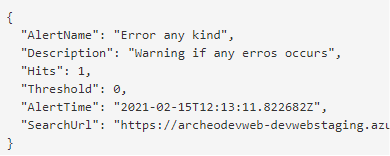
Where the SearchUrl is the link to the search that triggered the altert.
5. Alert log:
Lists all triggered alert, with the “View Result” link to open search view with result that triggered the alert.

With the introduction of webhooks as a distributed channel, Archeo now offers resending to a selected webhook.
Resend one step
Right click on the step you want to resend:
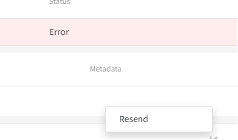
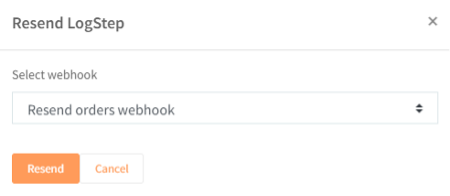
Resend the step to selected webhook:
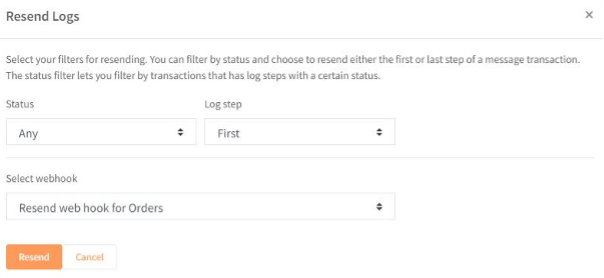
Resend one or multiple steps
Select all the transactions you want to resend. Click on the 3 dots and select "Resend selected":
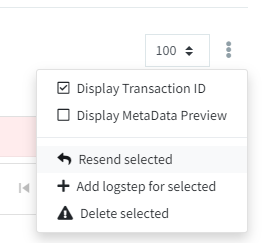
This opens the resend form, where you can set filter on what to resend, specify the optional status and required log step (first og last) to resend. Select what webhook to use and resend all steps:
Archeo has a main dashboard, to add a new widget click “Add new widget”:

Fill out the form with the chosen values for the following properties:
| Property | Description |
| Title (mandatory) | The title of the widget |
| Description | Description of the widget |
| Transaction types (mandatory) | The transaction types to show, with multiple choice |
| Status (mandatory) | Select all or a spesific status |
| Chart type (mandatory) | Type supported; line, bar or stacked |
| Resolution (mandatory) | The timeslot between each point |
| Time Span (mandatory) | The time span |
Click save and close. The widget may look something like this:
.png?width=931&height=375&name=39%20(1).png)
To use the public Archeo API (https://api.archeo.no/swagger/), you need an API-key. This is generated in the Administration menu → API-Key section. You may have as many active API-keys as desired, but a good rule of thumb is to have only one active at any given time. If the key is compromised, deactivate the key and the key will stop working within 2 minutes.

The public API: https://api.archeo.no/swagger/
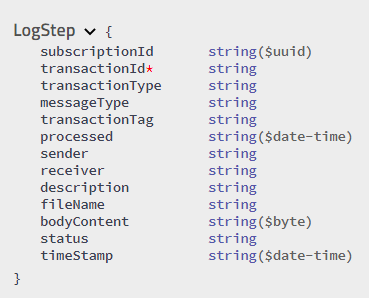
Model of the logstep data model used in logging:
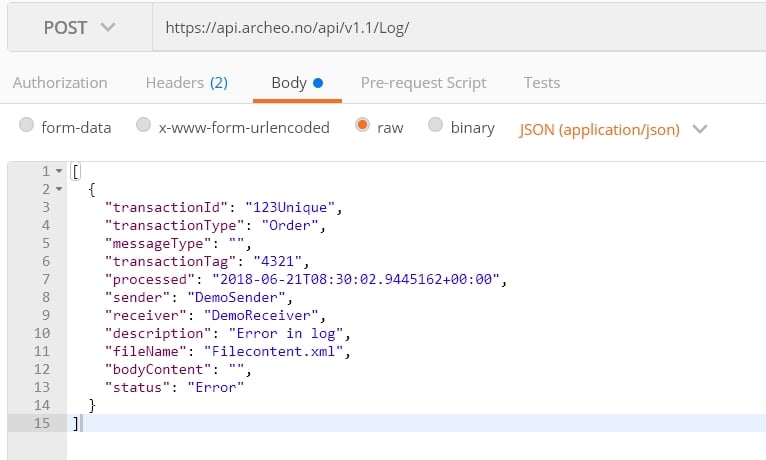
The API consumes a list of the log steps. Note, that if any steps fail validation, the entire batch will be discarded.
JSON example:
[
  {
    "transactionId": "Unique chosen id for this transaction.",
    "transactionType": "My Transaction Type",
    "messageType": "My Message Type",
    "transactionTag": "(Optional) Unique self chosen id for this message log",
    "processed": "2019-01-25T09:08:42.3761485+00:00",
    "sender": "(Optional) Sender of the message",
    "receiver": "(Optional) Receiver of the message",
    "description": "(Optional) Descriptive info message",
    "fileName": "(Optional) Filename of transaction",
    "status": "Success"
  }
]
Add the API-Key in header:

Post to the API based on the model. Note; the transaction type and the status needs to be preconfigured in Archeo as described earlier.
Create a class to represent the Model
 public class LogStep
        {
            public string AuthGuid { get; set; }
            public string TransactionId { get; set; }
            public string TransactionType { get; set; }
            public string MessageType { get; set; }
            public string TransactionTag { get; set; }
            public DateTime Processed { get; set; }
            public string Sender { get; set; }
            public string Receiver { get; set; }
            public string Description { get; set; }
            public string FileName { get; set; }
            public byte[] BodyContent { get; set; }
            public string Status { get; set; }
        }
Add data to the model:
            LogStep step = new LogStep();
            step.TransactionId = tranid;
            step.TransactionType = "Ordre";
            step.MessageType = "Ordre";
            step.Processed = DateTime.Now;
            step.Status = "Started";
            step.BodyContent = GetContent(@"C:\Demo\Order.xml");
            step.FileName = "ordre.xml";
            step.Description = "Ordre mottat MessageHub";
            step.Sender = "Nille";
            step.Receiver = "Message Hub";
            step.TransactionTag = "10001";
            listOfSteps.Add(step);
Add item(s) to a list, set APIKey and Log to REST service:
HttpClient.BaseAddress = new Uri(“https://api.archeo.no/api/v1.1/“);
HttpClient.DefaultRequestHeaders.Accept.Clear();
HttpClient.DefaultRequestHeaders.Accept.Add(new MediaTypeWithQualityHeaderValue(“application/json”));
HttpClient.DefaultRequestHeaders.Add(“APIKEY”, APIKey);
var response = HttpClient.PostAsync(“Log”, new StringContent(JsonConvert.SerializeObject(LogItemAsList), Encoding.UTF8, “application/json”)).Result;
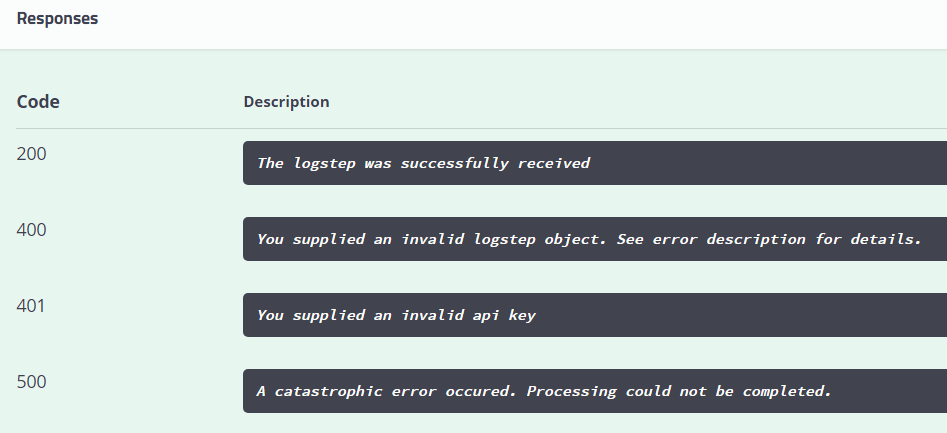
Response:
Archeo will provide tree levels of support.
With Basic support you will be able to use the forum which is under development.
Forum and E-mail support.
With Enterprise level we can offer priority support, with phone support CET 9-17 and technical management support. We will help your organisation to get started with Archeo, including advice with onboarding, best practices and optimising the usage of Archeo to achive your bussiness goals.
Archeo now supports configuration by API. It currently supports configuration of transaction types, message types and statuses. This functionality allows a more flexible configuration experience as part of automated systems and deployment procedures.
Check it out and test it from https://api.archeo.no/swagger
This weekend we deployed our new and improved Archeo portal. We are now using newer frameworks and made improvements to the interface which means that you as the end user has a better user experience. The changes include:
We have now deployed changes that improves performance and responsiveness throughout Archeo. This means you will see improved response times when calling the logging API.